The Point
Locust is, if you believe the hype, the HOLY GRAIL of obscure Python-based distributed load testing tools with real-time web-based statistics:
I’ve tried a few different times to get Locust up and running on Windows, and every time something has gone wrong enough for me to be demotivated and quit. ‘Cause, y’know, I’m a quitter.
Until now!
My goal is to help YOU get Locust setup on your Windows machine in the “recommended” way, so you can bring down your server by flooding it with thousands of requests too. There is something awe-some about having the power to bring down a server remotely just by typing “100,000” in the “How many users?” input box…
Prerequisites
As is the case with most Python and Ruby stuff on Windows, there are a bunch of things you need installed and properly configured to successfully run Locust. In this post, I document all of the things I needed to make it work. This is after having tried a bunch of things that didn’t work, uninstalling everything, and starting from scratch.
Python 2.7
Well, hey! Locust is just a big ol’ Python script, so you need Python. Let’s just save you a bunch of frustrating hours right now, and tell you that everything we’ll be installing is 32-bit. That’s because Locust doesn’t support 64-bit Python! You wouldn’t know that by searching the Locust site, docs, or even searching for “locust python 64 bit” in Google. But trust me. 32-bit is the way to go.
- Go to http://www.python.org/download
- Look for the latest Python 2.7.x Windows Installer link:

- Download that and run the installer
- You can keep all of the defaults, but take note of where it installs (probably C:\Python27)
- Once complete, make sure your PATH system environment variable is set correctly (something like this):
![]()
- Open a command prompt and enter “python” and see what you see. Hopefully this:


curl
When you need to download stuff from the command line, you need curl. You can just download the standalone .exe (32-bit!), or you can install the full cygwin suite, if you want.
I got it for free when I installed git. You may already have it! Just type “curl” at a command prompt, and you’ll know.
Python Tools
Next, you’ll need either setuptools or distribute. For my money, distribute is WAY better. Or wait, was it setuptools that was better? Oh, right, it doesn’t matter.
Here is the fast and easy way to install distribute:
- In a command prompt, navigate to your Python install directory (C:\Python27)
- Type this to download and run (install) distribute:
> curl http://python-distribute.org/distribute_setup.py | python
easy_install
Many people like pip better than easy_install, either because of its adorable name, or because it actually displays useful error messages, but easy_install can run Windows executables, and pip can’t. So we need it. Even more hilarious is the fact that we will be installing pip in the next step! BWAAAHAHAHAHAHAAAA!!!!
What’s really cool is that we already have easy_install, since we installed distribute in the last step!
virtualenv (and pip!)
Virtualenv lets you create isolated Python environments, so there’s less of a chance you’ll screw something up. Don’t worry, you’ll probably screw something else up, because now all of your dependencies have to be available within the isolated environment, but some cool kids told me that virtualenv was the bomb, so I believed them. Run these from the same command prompt location we were using before and simmer in the coolness:
> curl -O https://raw.github.com/pypa/virtualenv/master/virtualenv.py

> python virtualenv.py dev

> . dev/Scripts/activate
The first line grabs the Python script and drops it in the current directory. The second line creates a new virtual Python environment called “dev” (YOU can call it whatevs you want!). The last line “activates”, or switches you over to, the new virtual environment.
“Aw, look, it’s Pip!”
gevent
If you believe what their website says, gevent is a network library that provides a fast event loop. This is why Locust can simulate eleventy billion users on a single machine. Or twevinity quillion if you have two machines.
I say, get it! Here’s how. From the same command prompt, run:
> easy_install http://pypi.python.org/packages/2.7/g/gevent/gevent-0.13.8.win32-py2.7.exe
greenlets
greenlets are wee micro-threads, or coroutines, that do little cute stuff like “tasks”. They are best friends with gevent.
Do this from Senor El Command Prompt if you want them, which you do, if you ever want locust to work:
> easy_install http://pypi.python.org/packages/2.7/g/greenlet/greenlet-0.4.0.win32-py2.7.exe
Locust Installation
Finally! We can install locust, which is furiously simple now that everything else is in place. We could do this with easy_install, but we installed pip, and haven’t used it, so let’s do that instead:
> pip install locustio
Distributed Test Army!
If you’ll be running this on more than one machine, you will need to install pyzmq and gevent-zeromq for insano-distributed magic-action. It should be as easy as running pip install for those two, but since it’s Windows, it’s not!
pyzmq
For pyzmq, download the 32-bit version for Python 2.7 from here: https://github.com/zeromq/pyzmq/downloads.

When you install it, be sure to select a different Python installation! You need the one you created in virtualenv, so for me, that’s:
C:\Python27\dev
It only needs the root of the installation (there’s a python.exe under that dev directory, and that’s what gets run).
gevent-zeromq
We just need this guy so gevent can talk to pyzmq. Luckily, you just need this:
> pip install gevent-zeromq
Locust Scripting
If I was 100% accurate in my instructions above, you should have a working install of Locust! Applause! Now it’s time to make it do stuff.
The one part of the Locust documentation that’s passable is the scripting stuff. Although they only have a couple examples, they list all the stuff the API can do. I’m afraid you’re in for some trial and error if you need to do some of the more advanced stuff, however.
Here’s a script I wrote, which I’ve commented up For Help’s Sake:
# magick.py

from locust import Locust, TaskSet, task

class WebsiteTasks(TaskSet):
    # Do this before tasks start
    def on_start(self):
        # Set any required HTTP Headers
        self.client.headers['Accept-Language'] = "en-US,en;q=0.8"

        # POST some form data
        self.client.post("/home/login", {
            "UserName": "nheldman",
            "Password": "password"
        })

    # Run this task with weighting 2 (twice as much as the one below)
    @task(2)
    def index(self):
        # GET the home page
        self.client.get("/")

    @task(1)
    def contact(self):
        # GET the Contact page
        self.client.get("/contact/")

class WebsiteUser(Locust):
    # What task class are we running?  (the one above!)
    task_set = WebsiteTasks

    # What's the minimum wait time between requests?
    min_wait = 1000

    # And the maximum?
    max_wait = 3000

    # What is our base host for testing (prepended to GETs/POSTs above)?
    host = "http://localhost:64175"
So, the scripting language is a world of its own, but it’s small, and elegant.
Now that I have a script, I can run it like so from Kommand Prompt:
> locust -f magick.py
If that works, the hard part is over. It should show you now that it’s running:

Running Locust
Okay, fantastic! Now we have a web monitor running!
Here’s the part where you’re going to think I’m really stupid. I didn’t know what to do next. Okay, I’ve done Rails development, node.js development, and worked with plenty of environments that ran a lightweight web server on some port.
So why didn’t I just open a browser and visit http://localhost:8089?
Because it didn’t say I needed to ANYWHERE IN THE LOCUST DOCUMENTATION!
Yes, it should have been obvious to me. Really obvious.
And yet, because I was following other instructions on the Locust site, I guess I expected it to say “open a browser”. It didn’t, so I didn’t.
But then I did.

Imagine my joy when I saw this screen. It’s the first time I realized how I can tell Locust how many users to simulate, and how fast they should ramp up.
Why is it the first time? Because it’s not ANYWHERE IN THE LOCUST DOCUMENTATION, NOR IS THERE A SCREENSHOT!
So, now it’s easy. Just type in “100,000” in the first box (yes, ALWAYS start with 100,000 users), and something smaller in the second box, and click “Start Swarming”.
In reality, I started with 100 users, with a hatch rate of 2.
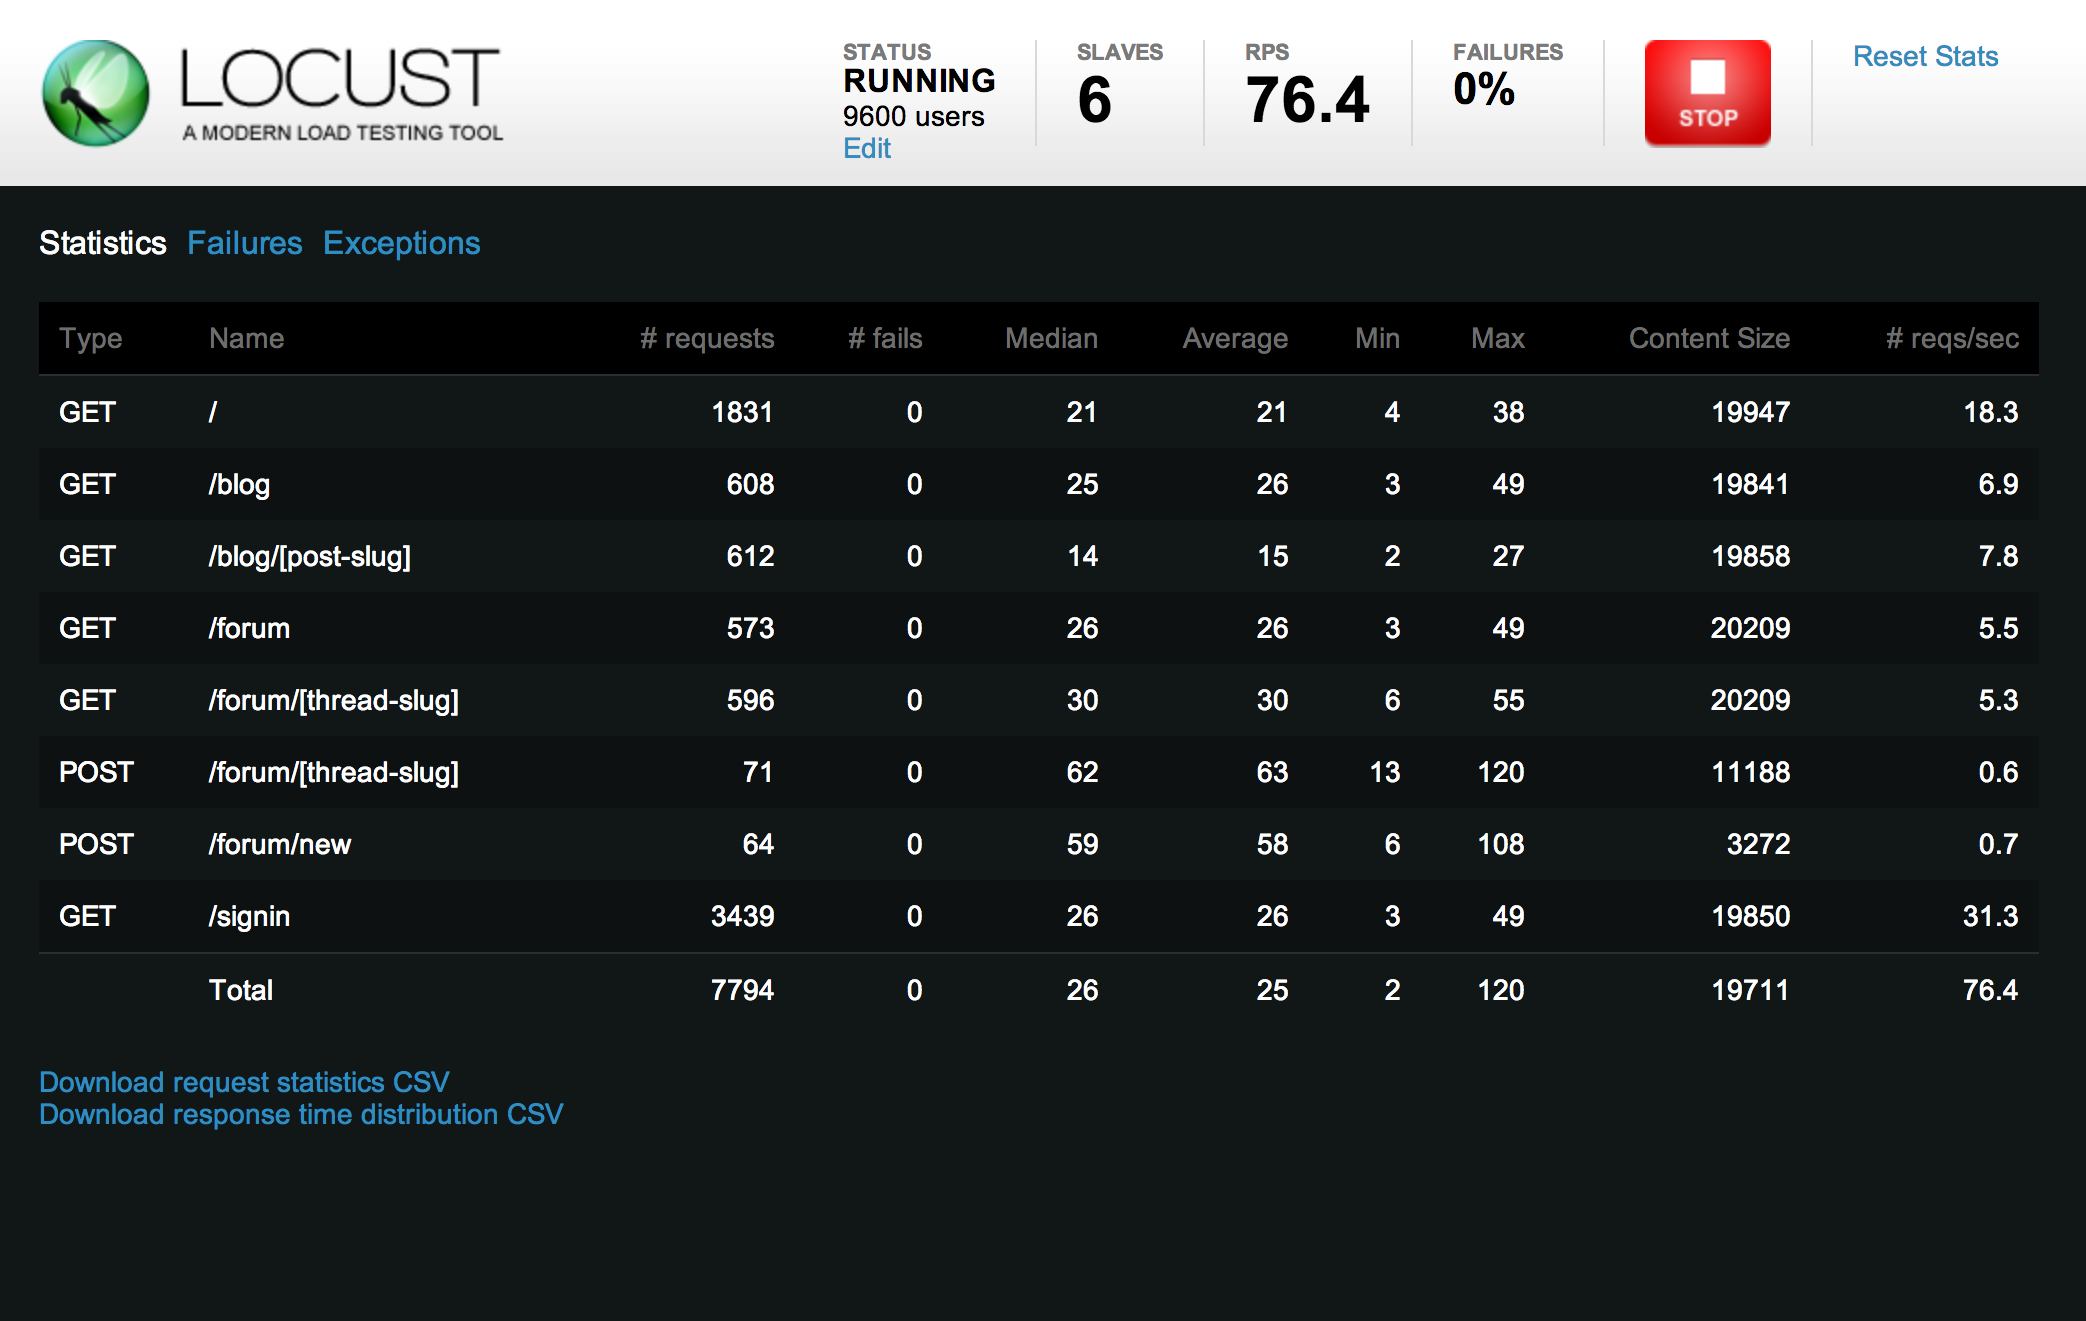
Behold! You will see the magical-ness that is this:

Interpreting Results
In my example above, I have a comically high number of failures, and an even more comically low number of Requests per Second (RPS).
That’s because after all of this effort installing and configuring, I wanted a screenshot to represent my pain. I promise it looks better when I write the script correctly.
The columns are mostly self-explanatory, but it’s worth noting that the Median, Average, Min, and Max represent the number of milliseconds it took for the page to load.
Yes, my page load times are abysmal. Don’t forget to start your .NET site before running load tests against it, or page compiling will invalidate your results!
Conclusion: Maybe Don't?
Before finding Locust, I used multi-mechanize. Locust looked shinier and modern-er, and it seemed like it would be much easier to get up and running on Windows.
Although it was just as much of a pain to install and configure, it definitely looks nicer than multi-mechanize, and can probably handle higher simulated load on a single machine.
Multi-mechanize has more charts out of the box, though they can be a bit confusing.
Locust is worth a shot, if what you see above appeals to you.
However, if you have Visual Studio Ultimate, use that. It’s just better. It has tightly integrated load testing tools that are flexible and provide meaningful feedback:

Thank you for riding on the Windows Pain Wheel with me. Here’s hoping Locust documentation gets better, and maybe even shows some swell charts!